Create a Microsoft Teams Tab with Blazor
This post highlights how you can use ASP.NET Blazor Server Side to host your Microsoft Teams tabs. The link to Teams can be achieved by leveraging the Teams JavaScript API, authentication is provided through ADAL.JS. As soon as we get our access token to the Microsoft Graph, we can call endpoints in native C# and visualize the data in Razor components. On both ends in Blazor, UI and data, you can reuse your C# skills or your existing business logic libraries to bring those to Microsoft Teams as a tab.
The actual demo was part of a PnP call in May 2020. You can find the recording down below or you just look at the screenshot summary of the call done by amazing David Warner at http://warner.digital/pnpsummary05282020/.
Motivation
Around three years ago Microsoft released the SharePoint Framework as *the* next-generation development model for all things SharePoint. With SPfX, all the SharePoint developers had to move to the client-side development story. That means using yeoman generators, gulp, webpack to write TypeScript web parts in Visual Studio Code.
This change in the developer model happened when I already stopped writing code daily and moved on in a more architect like role. Although I do understand the concepts and probably could start to invest more time to get more efficient in this new world, I don’t spend enough time in a code editor anymore to get anywhere close to the level of my colleagues. I only can bring my rusty C# skills to the game.
With the introduction of WebAssembly, Blazor got my attention. That’s already 2-3 years ago, and with the ASP.NET Blazor Server-Side release in September 2019 and the Client-Side release last week at Build 2020 it’s time to have a close look on what this “new” technology has to offer for my current focus, Teams development.
The SharePoint nerd in me also believes that three years are enough for a development model. We used to change those every couple of years. So why breaking a tradition? (Yes, that’s sarcasm Sheldon)
Blazor Server and Client-Side
There are two different types of Blazor in the ASP.NET Core framework at the moment. One is called Blazor Server Side, the other Blazor Client Side.
Blazor Server-Side is a typical web application using Razor components and C# to create the experience for the users. It runs on a server, and that server has an active Signal R connection to its clients. This means when you load a Blazor Server-Side page you get some bits and pieces of the page served in your browser and whenever an event is triggered, the client calls the server using this Signal R connection. I’m of course oversimplifying things here, so for the latest details, please check out the docs.
Blazor Client-Side uses WebAssemblies. That’s a different ball game. With WebAssemblies (WASM), a client requests your site and downloads a bunch of DLLs. Those DLLs a served in a security sandbox in your browser, quite the same architecture as JavaScript by the way. WASM allows you to serve the complete site at once to the client and everything from rendering to compute happens on the client. It also allows offline use of your site and is one option to create what’s called progressive web applications. Also, WASM allows us to serve those sites as an Azure Static Site. This means we can go serverless with our site because there is no backend computing included.
Of course, both approaches have different pros and cons. Server-Side Blazor is faster than Client-Side, for example. Also, with WASM, your initial load is a lot bigger than with the Server Side. In my testing, by just making a dummy Teams Tab, without any tree shaking or release built optimizations, my Client Side hello world project already was close to 10 megabytes. That gets smaller with production-grade tooling, but of course, it puts more weight on that very first-page transfer.
A significant difference is security related. We all know that browsers downloading DLLs means that someone can find those DLLs on his machine and can decompile those with ease. Hence, as in SPfX, no credentials should be saved in variables in your WASM app. Please don’t add the connection string to your Azure Table there. Someone finds it, sooner or later. Those things are better handled on the server-side.
Getting started with Blazor in Teams
For this post, we focus on Blazor Server-Side. I still need some hours to code through the client-side, and there is not enough time in my schedule to do all the things I would like to address in a given week.
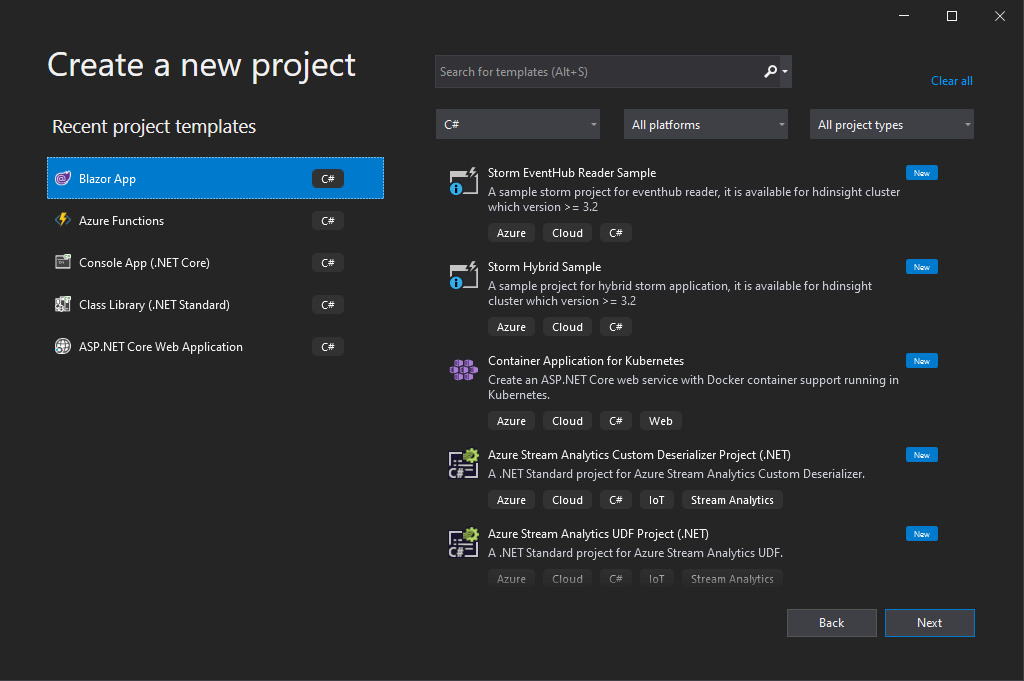
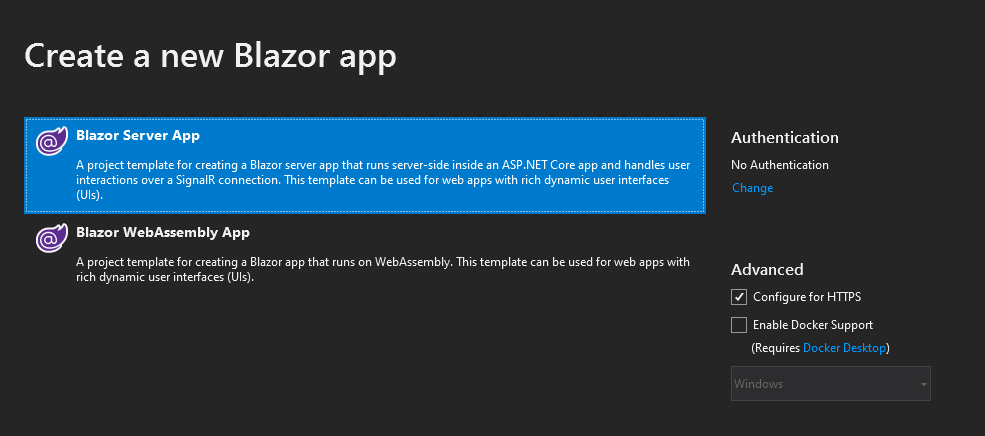
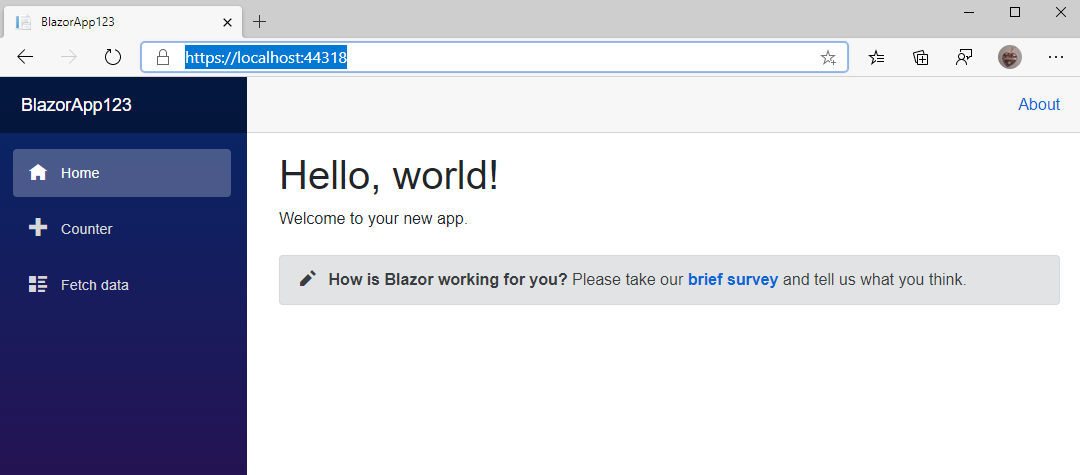
We start with the sample project Visual Studio scaffolds for Blazor. As we are going to use the server-side app, please select the first option in the wizard. At that moment, you can press F5 and start your project. Visual Studio opens the local browser, and you should see the example app up and running.
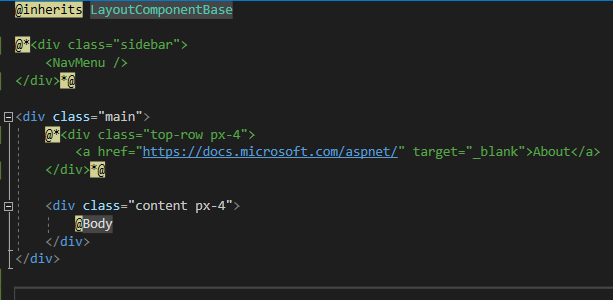
The app in the browser is structured in multiple areas. We have a top-level row, left navigation and the main content. If you want to add this page to Microsoft Teams as a tab, think of the navigation. Teams already has its own navigation UI in place. Adding a second left navigation confuses users. Right at the moment, Microsoft prefers app layouts that don’t add additional layers of navigation to Teams. For our next step, we only focus on the main content and hide all other elements. We add navigation elements later by using the tab configuration in the Teams manifest file.
Before we head into changing code in the sample, please have a look at https://docs.microsoft.com/en-us/aspnet/core/blazor/get-started?view=aspnetcore-3.1&tabs=visual-studio to make your self familiar with the overall concepts of Blazor. To keep this somehow small and readable, I can’t go into every single detail of the framework here.
Make the sample “Teams ready”
At first, we need to get rid of the navigation. Open MainLayout.razor and hide the divs including the NavMenu and the About link.
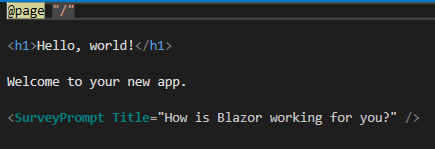
Open Index.razor and add a custom greeting or sentence to the existing welcome message. Comment out the SurveyPrompt tag in line 7 to keep your project simple. Next press F5 again and start the project. You should see a stripped-down version of the sample project without anything else but the main content.
Create Teams manifest file
To sideload your webpage in Teams, we need to create a teams application definition. This means we need to create a teams manifest file and reference the web application serving our page. If you are not familiar with all the options in a manifest file open Teams and install the app “App Studio” from the app store. Follow all the steps from https://docs.microsoft.com/en-us/microsoftteams/platform/tabs/how-to/add-tab to create a new app with a personal or team tab.
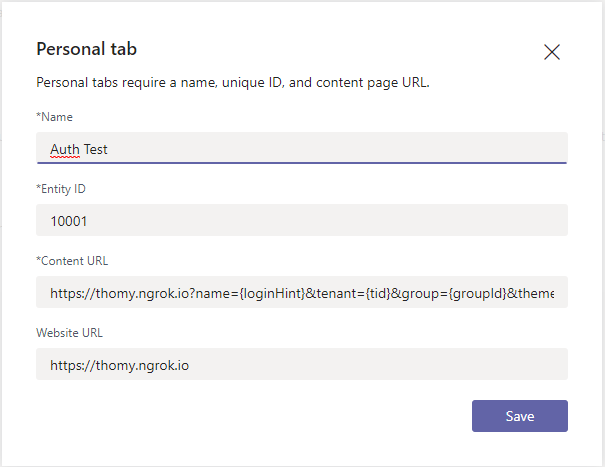
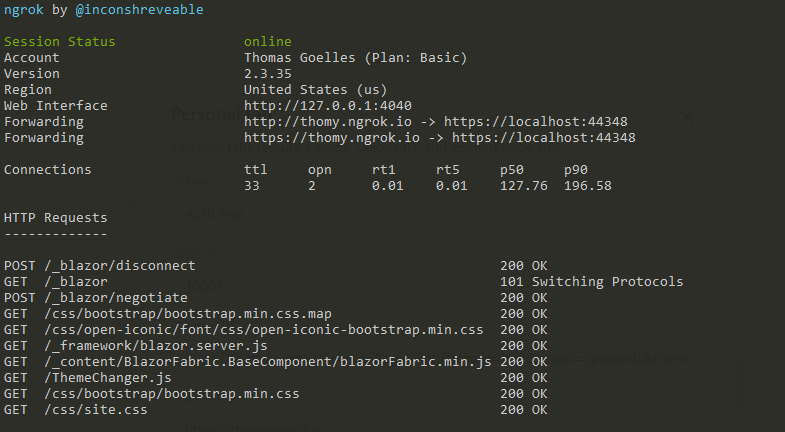
The App Studio allows you to define a URL for your tab. As we want to create a developer instance of our tab that is served locally, we need another tool to help us, ngrok. Ngrok allows you to expose local URLs as public URLs. It tunnels your local IIS page to the internet and makes it accessible with a custom URL. I highly recommend investing in at least the basic paid tier of ngrok. You can use the free one for testing the tool and get started, but the free tool gives you a new URL every 8 hours. This means that every day you need to update your tab definitions and later on your Azure AD app configuration if we add security to our app. By using the paid tier, you can define custom domains in ngrok instead. Check out https://docs.microsoft.com/en-us/microsoftteams/platform/concepts/build-and-test/debug for more details. Start ngork to make sure your tunnel is active. The command I use is ngrok http https://localhost:44348 -host-header=rewrite -subdomain=thomy
I always create a ngrok.txt file and add this command as a read me. I keep ngrok running in the background for a whole day of development. Having that line documented makes sure I have everything up and running within minutes, and I don’t need to remember every single bit of configuration included.
Let’s head back to the App Studio definition. In the Teams tab section of the tool add the URL that ngrok gives you or the custom ngrok domain you created for your tab. This tells Teams to load the tab from that URL. Ngrok takes a request to that URL and hands it over to your machine where your IIS Express installation from Visual Studio serves the content back to your browser.
At that stage, you download the app definition by clicking on Download in the Test and distribute section of App Studio. At the point of writing, App Studio has a bug not allowing tunnelling sites in Tabs. App Studio wants to add the domain of your tab to the secure domain list, and tunnelling sites are not allowed in there at the moment. But you can just download the package and add additional steps to that file later on.
First run in Microsoft Teams
Press F5 in Visual Studio to start your web project. Make sure ngrok is running and ready to tunnelling your requests. Head over to Teams and sideload the app definition you just created. Open the tab you defined in your definition file, and you should see the very basic example app running. Something like this:
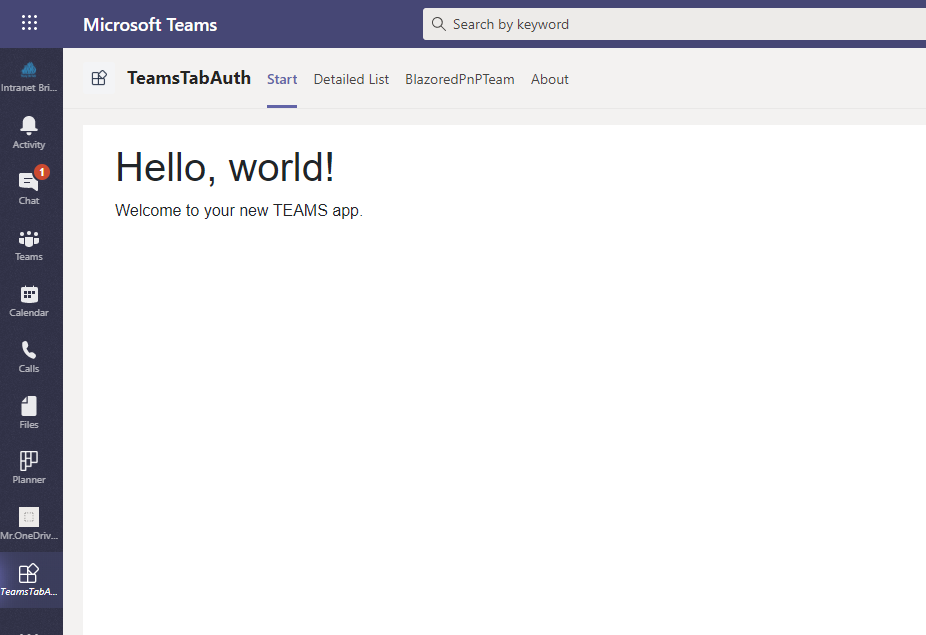
Congratulations you have your first Blazor application running in Microsoft Teams.
Authentication in Blazor
As we now established the baseline of Blazor in Teams let’s go ahead and add authentication to your app. The goal of this next step is two things. We want to get the Teams context of the current tab, and we want to connect to the Microsoft Graph and hit the “me” endpoint and show some data of the current user.
For that to work, we need a couple of things aligned correctly. At first, we need an Azure AD application in your tenant that allows you to reach out to the cloud and start the authentication and authorization handshake. We will use methods from the Microsoft Teams JavaScript SDK and ADAL.JS to start the auth flow and help us to retrieve the access token we need. We then use a simple http call to the Graph with that access token attached to retrieve the data.
Azure AD application
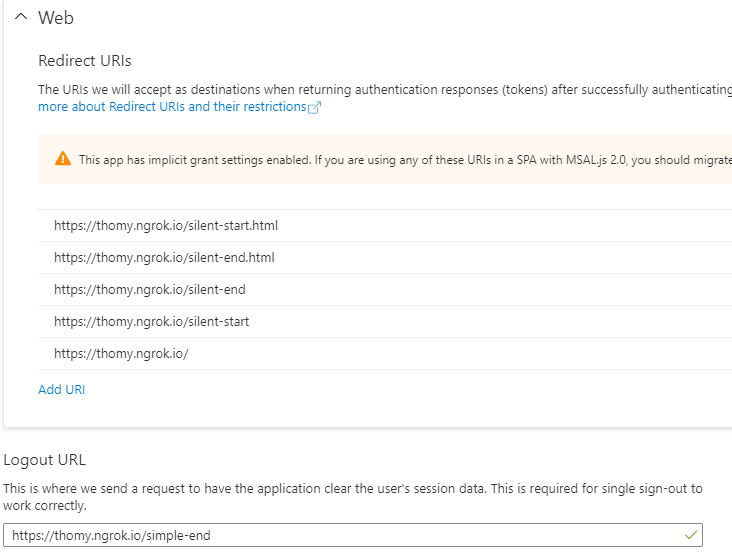
To get started with your Azure AD app, please follow the guide at https://docs.microsoft.com/en-us/azure/active-directory/develop/quickstart-register-app. Under “Authentication” make sure to add all redirect URIs for your web application. For this example, we use what’s called the silent sign-in flow. That means that our code looks in the local cache for an access token of the current user and shows a login button if there is none. This login button opens a pop up that starts the actual authentication flow and hands over yet another URL to the process as a callback target. For the example to work you need all three URIs, your main start page, the auth start pop up and the auth end pop up listed as a redirect URI. I’m already playing with other configurations as well, but here is my list.
Under Implicit grant, make sure to check both boxes as we are going to need both elements, ID token and the access token.

For the actual authorization of your app, we need to configure permissions under API permissions. Make sure to add the proper permissions here to allow access to the defined endpoints. Once again, I already use more endpoints in my demo app. You should be good with user.Read.
Implement the Teams Tab
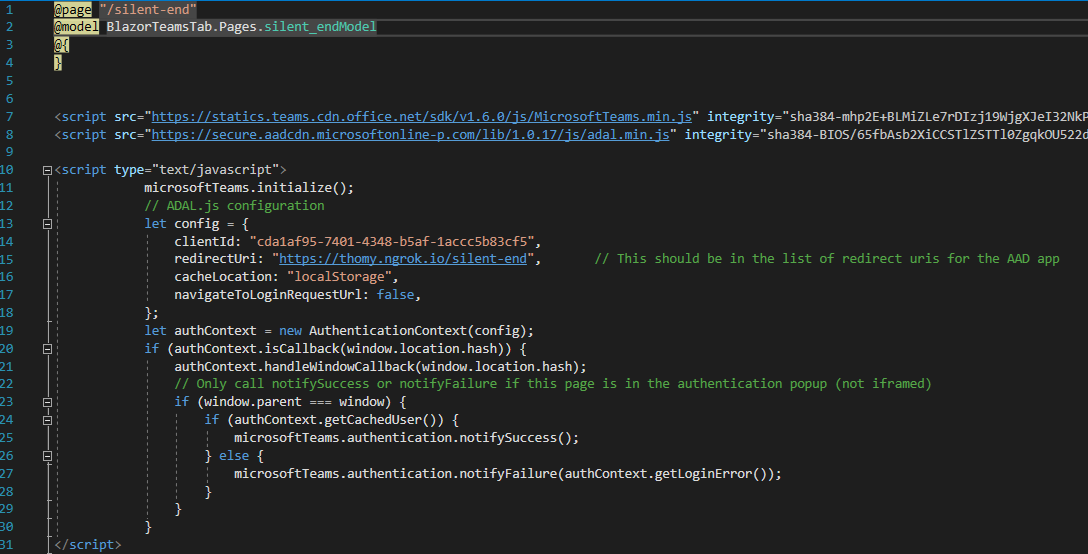
With the Azure AD application set up, we can start implementing the authentication in our Teams tab project. For my demo, I used the authentication code from this project on GitHub https://github.com/OfficeDev/microsoft-teams-sample-auth-node/tree/master/src/views/tab/silent. I ended up copying everything from the body part of silent.hbs to my _Host.cshtml page to make sure I have the basic setup there. You can delete the showUserInformation function as we are not using this part. For the other two files from the GitHub repo, you need to create two files in your local project. I named mine silent_start.cshtml and silent_end.cshtml. For both files, add the whole body part from the corresponding file from the GitHub project.
We now have the code we need in place, and now it’s time to configure the calls to our Azure AD application. In all three files make sure that every reference of “clientId” points to the Id of your Azure AD application we created a couple of minutes ago. You find the Id in the Overview part of your app as “Application (client) ID”. Copy that GUID to every “clientId” variable in the three files. Next, make sure that every reference of “redirectUri” points to your “silent_end.cshtml” page. To get the correct route, make sure to add something like @page “/silent-end” to your silent_end.cshtml file. It should look like this:
With that in place, we need to change the URL parameter of the login function in your _Host.cshtml. We are using the Microsoft Teams SDK Authentication namespace to start our auth flow. Make sure that the “url” config points to your silent_start.cshtml page. As above, make sure to add the proper route in your file. Your login function should look like this:
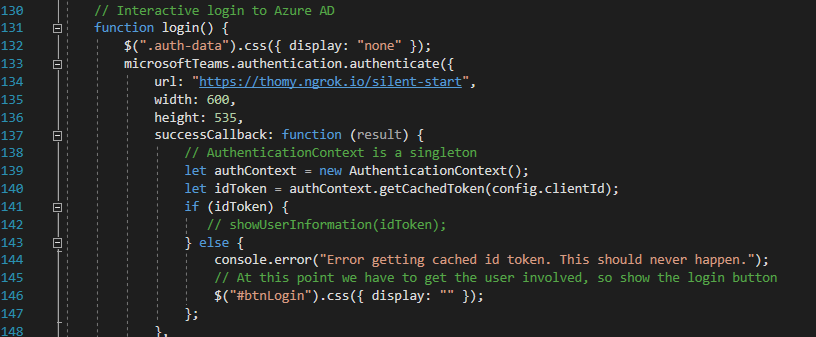
Now would be the perfect time to double-check you Azure AD application and its Redirect URIs. Make sure that those routes you created in the start and end file are listed there; otherwise, you will get an error during the authentication flow.
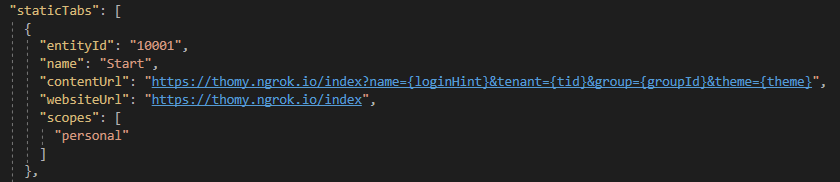
If you look through the code in your _Host.cshtml you will see that there is an “extraQueryParameter” config value in the Adal.js configuration. This is needed to tell the Azure AD to add profile scope and profile information to the id token. It also defines how we are setting up our login_hint. The code should already be ok, but we need to update our Teams application manifest to include these additional URL parameters in the contentUrl property. Mine, for example, looks like this:
With everything in place now, we should be able to open our application in Teams, and if you open the tab, you will see the HTML content of the start.hbs file from GitHub and a login button. If you click on that login button, the auth start page should pop up, and you need to consent the authentication to your Azure AD application. If you follow through the login button should be gone, and you are already authenticated. To prove that point open up the developer tools of your browser and look for the local storage of your application. You should find a whole list of entries there starting with ADAL. This should look similar to this:
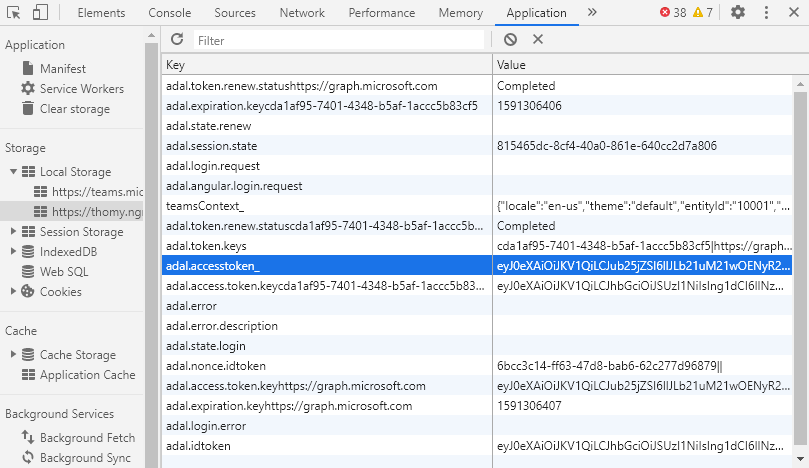
Reuse the Access Token in Blazor
All we did in terms of authentication had one goal, to get the access token for calling the Microsoft Graph. The screenshot above shows that we have the token and much more information stored in the local storage. Seeing this reminded me of the age-old trick to share the local storage between different applications. In our setup, we use JavaScript in Blazor to do the whole authentication dance to reuse the stored access token in Blazor. To make sure we have our instance of the token during testing, I added my own entry to make sure I’m not interfering with the ADAL.JS library. You can see that above at the adal.accesstoken_ key entry. To make this happen, we store the access token from the acquireToken call in the local storage like this:
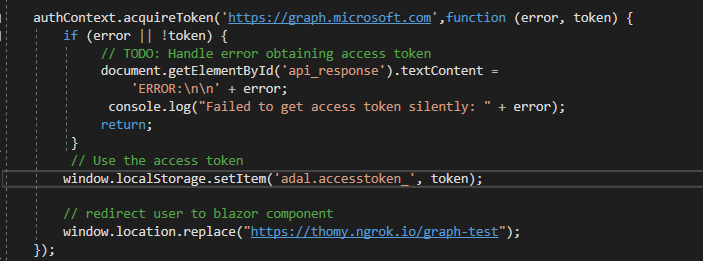
In the screen above you also see that I’m redirecting users to a different route after authentication was successful. This means the only purpose of my index page is to manage authentication and show an error in case there is a problem. I like that approach because it allows me to split my JavaScript authentication code from the rest of my Blazor project. But of course, this can be handled differently as well.
Reuse the current Teams context in Blazor
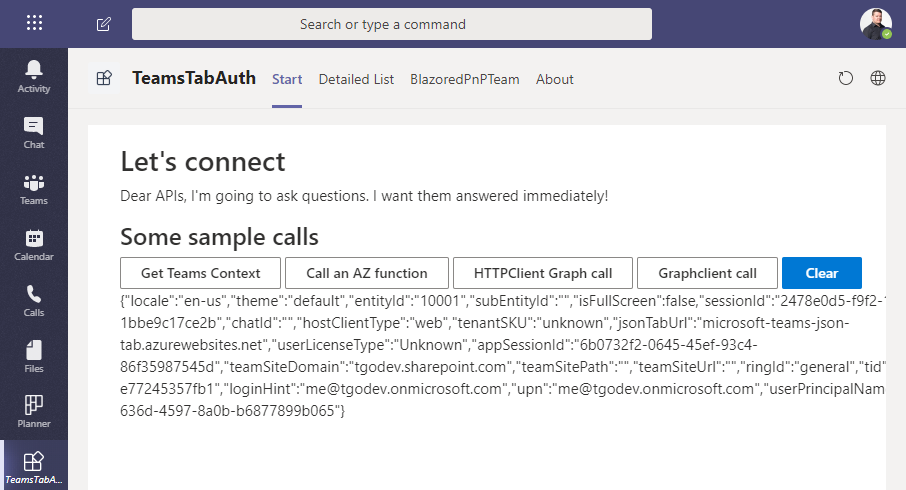
What worked perfect for the access token, also works for the current Teams context. We are going to do the same trick and use the local storage once more to exchange data between the JavaScript and C# part of our Blazor application. After we initialize the use of the Microsoft Teams JavaScript SDK we call the getContext function and store the context as a JSON string to the local storage.
As said before, I’m redirecting the user after a successful authentication to my actual app content. For the sake of the demo, I just called that “GraphTest.razor” and the part we need to focus on looks like the screenshot below.
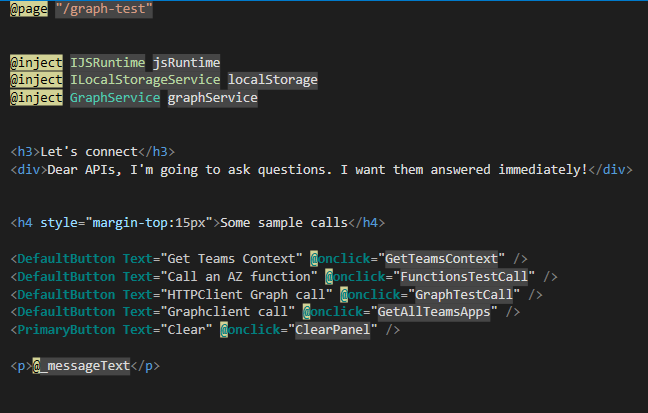
We are just adding some buttons and labels, but you already see Blazor syntax at the @onclick notation of our DefaultButton. Don’t get confused by the use of DefaultButton. This button is part of an additional library that already adds the look and feel of FluentUI to the app. For now, we are focusing on the GetTeamsContext() method:

Short and sweet. Only two lines. To access the local storage, I’m using the Blazored.LocalStorage npm package. You need to add this to your project and add it as a service in your Startup.cs with services.AddBlazoredLocalStorage();. With that in place, a click on the “Get Teams Context” button shows all the data of the current context.
Call the Microsoft Graph in Blazor
The last thing we want to achieve today is calling the Microsoft Graph and get some information about the current user. For the demo project, I already created a service within my application to handle all my Graph calls. For the sake of this post, we want to keep it simple and assume you just want to add the code to your version of “GraphTest.razor”.
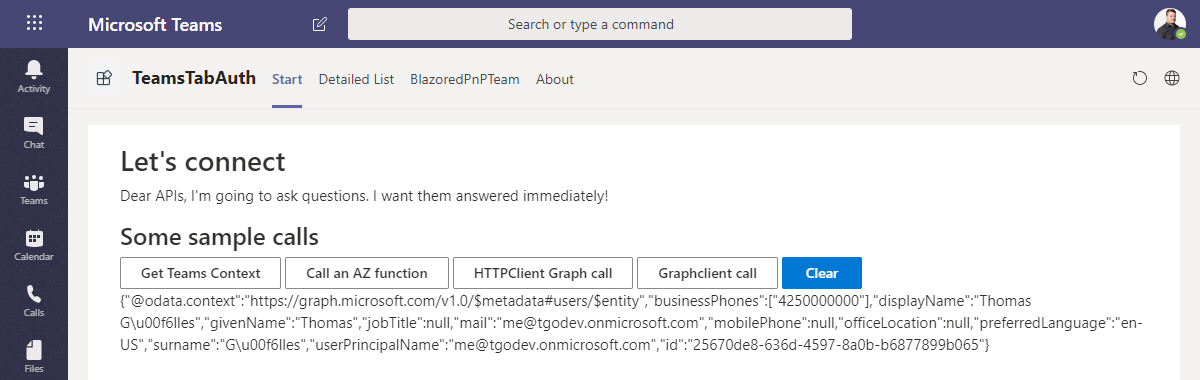
We are using a simple HttpClient to call the me endpoint of the Graph. In terms of authentication, we add the access token from adal.js as an AuthenticationHeaderValue to our request:

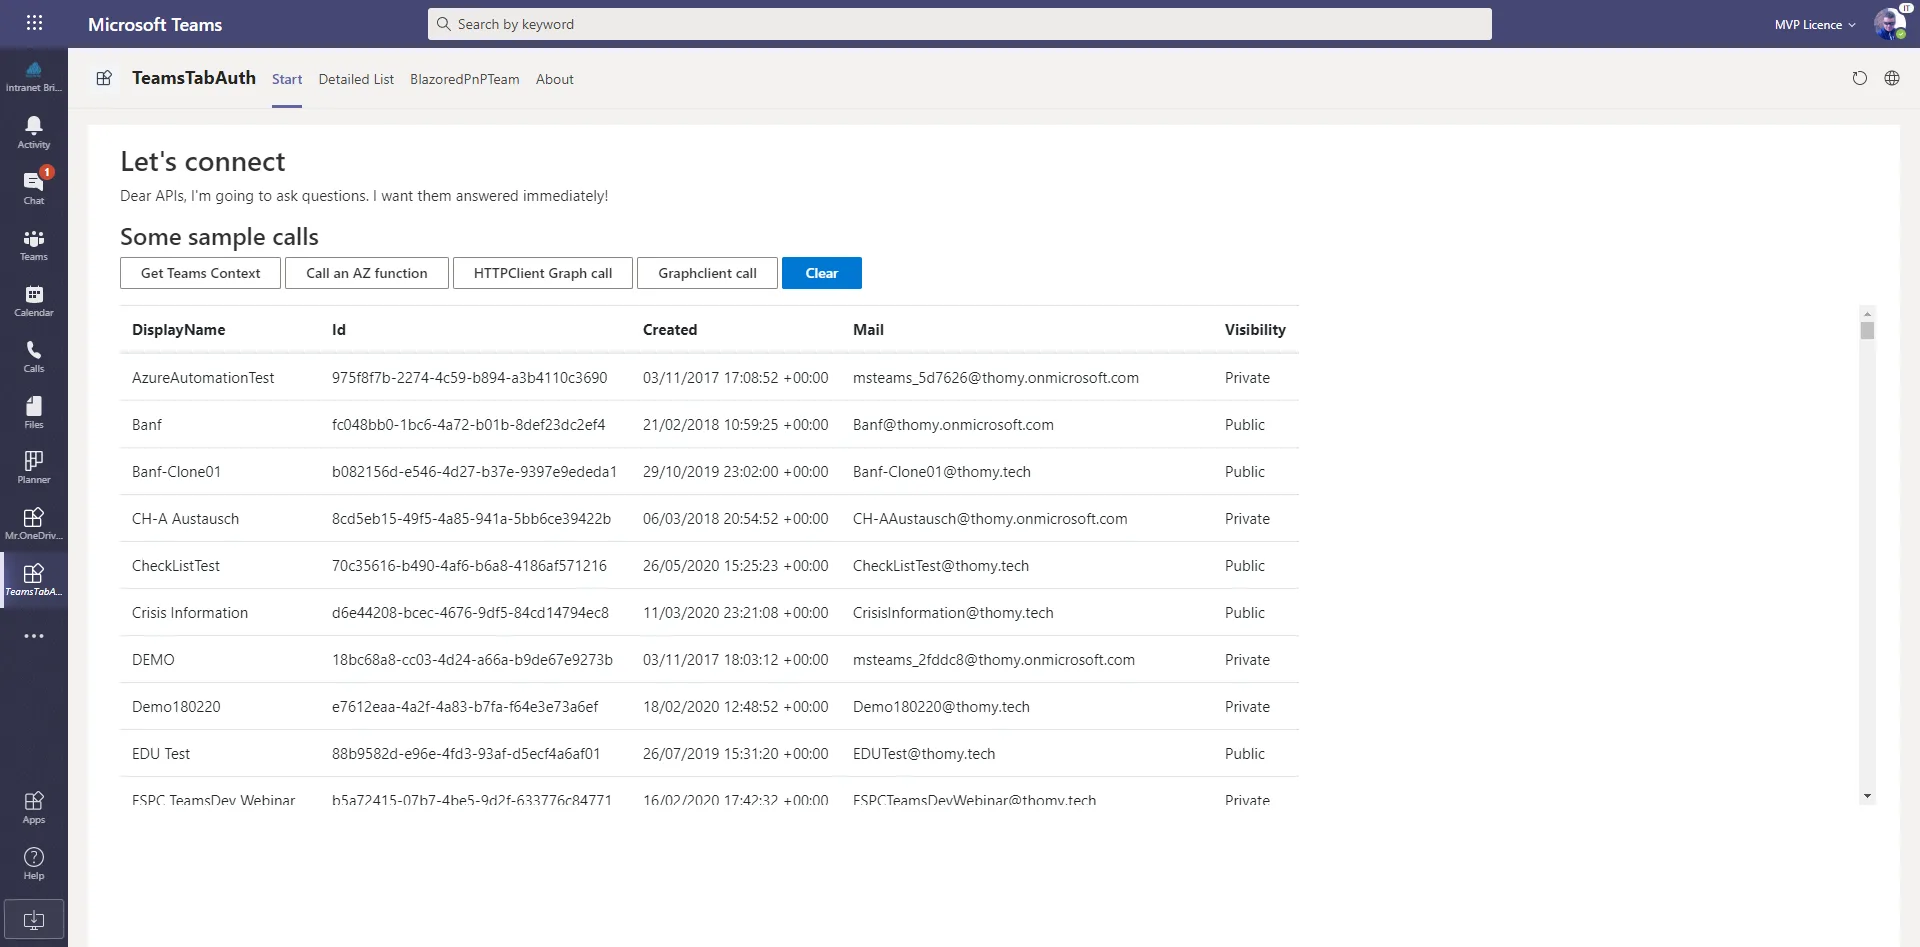
This method gets the access token as an input parameter. As discussed with the Teams context, I’m just reading the access token in the same fashion from the local storage and hand it over to my very own Graph service in my application. With that, the result of your call should look like this:
Summary
This post showed how you could use Blazor Server-Side in your next Microsoft Teams tab project. We walked through the steps of creating your first Blazor app based on the samples within Visual Studio. We modified the basic example to make it Teams ready and built a Teams app manifest. Furthermore, we added authentication to the application to call the Microsoft Graph and showed how you could hand over the current Teams context to your Blazor application.
The actual demo was part of a PnP call in May 2020. You can find the recording of that call with some more examples at https://www.youtube.com/watch?v=gtusCyOYePs. Or you just look at the screenshot summary of the call done by amazing David Warner at http://warner.digital/pnpsummary05282020/.
Slides from the call on Slideshare:
Blazor in Microsoft Teams from Thomas Gölles
I’m planning to release the sample project of the PnP call on Github. But I need some hours to get rid of some hacks in there. After that, the next step is starting to play with the WASM version of Blazor.
Enjoyed this post? Let's connect on LinkedIn:
Follow on LinkedIn →
